-
Courses

Courses
Choosing a course is one of the most important decisions you'll ever make! View our courses and see what our students and lecturers have to say about the courses you are interested in at the links below.
-
University Life
University Life
Each year more than 4,000 choose University of Galway as their University of choice. Find out what life at University of Galway is all about here.
-
About University of Galway
About University of Galway
Since 1845, University of Galway has been sharing the highest quality teaching and research with Ireland and the world. Find out what makes our University so special – from our distinguished history to the latest news and campus developments.
-
Colleges & Schools
Colleges & Schools
University of Galway has earned international recognition as a research-led university with a commitment to top quality teaching across a range of key areas of expertise.
-
Research & Innovation

Research & Innovation
University of Galway’s vibrant research community take on some of the most pressing challenges of our times.
-
Business & Industry
Guiding Breakthrough Research at University of Galway
We explore and facilitate commercial opportunities for the research community at University of Galway, as well as facilitating industry partnership.
-
Alumni & Friends

Alumni & Friends
There are 128,000 University of Galway alumni worldwide. Stay connected to your alumni community! Join our social networks and update your details online.
-
Community Engagement
Community Engagement
At University of Galway, we believe that the best learning takes place when you apply what you learn in a real world context. That's why many of our courses include work placements or community projects.
Creating Web Ready Images with Paint.net or Pixlr
Most images need to be loaded to t4’s media library before they are used. But some content types bypass this and expect you to load the image into the content type itself. Either way, the image should be web ready so that it doesn’t bloat your web page. Bigger than necessary images make the web pages slow to load and also negatively impact on search engine rankings. So each image you upload to t4 should be saved (usually as a JPG) that is 96 dots per inch (dpi). And they should be the recommended width and height for your chosen content type.
To check the dimensions required, go to the question below - Which content types need images, where do they go, and what size should they be?
Which content types need images, where do they go, and what size should they be?
Foreground Images
All foreground images are stored in Site Manager's media library. You can add these, alongside your content, any time you're in a content type that uses the WYSIWYG editor - just click the editor's 'Insert Media' button.![]()
They can be any width, up to the maximum space on the page. These maximum widths are:
Normal page (left-nav, no rightbar): 735px
Normal page (left-nav & rightbar): 450px
Widescreen: 990px
Ultra-wide: 1386px
For full information on working with foreground images , see our example page.
Background Images
Content types that incorporate images use background images - either the background image goes in the media library or else you attach it directly to the content type.
| Content Type | Size | Upload to Media Library | Attach to Content Type |
|---|---|---|---|
| College Page Hero Image | 1600 x 550 | - | Yes |
| Content Block with Image | 600 x 330 | - | Yes |
| Custom Landing Page Image | 1600 x 250 | Yes | - |
| Course Image Banner | 1600 x 711 | Yes | - |
| Course Video (thumbnail) | 144 x 100 | Yes | - |
| Download | 310 x 175 | Yes | - |
| Expanding Image Panel Item | 1600 x 1138 (desktop) 640 x 400 (mobile) |
- | Yes |
| Feature | 56 x 56 | Yes | - |
| Homepage Hero Image | 1600 x 680 | - | Yes |
| Image gallery: Carousel Images | 1600 x 830 (max) | Yes | - |
| Image Roundel (with description) | 400 x400 | - | Yes |
| Image: Static Image | 800 x 800 (max) | Yes | - |
| Homepage Parallax Sliding | Main: 1600 x 1069 Mobile: 767 x 400 Small: 480 x 290 |
- | Yes |
| In the Media Box | 110 x 110 | - | Yes |
| Interactive Video Gallery | 1200 x 800 | - | Yes |
| Landing Page Box | Large: 362 x 180 Small: 176 x 180 |
Yes | - |
| Large Content Box with Image | 176 x 176 | Yes | - |
| NUIG News | News: 705 x 400 Author: 200 x 200 |
Yes | - |
| Promo Box Large | 310 x 220 | - | Yes |
| Six Promo Image Boxes | 704 x 520 | - | Yes |
| Staff Contact | 150 x 128 | Yes | - |
| Staff List Item | 320 x 320 | - | Yes |
| Standard Media Library | First thumbnail: 584 x 584 Other thumbnails: 288 x 288 Full-Sized images: 800 x 600 |
- | Yes |
| Testimonial | 130 x 130 | - | Yes |
| Testimonial Background Image |
Full-sized: 1600 x 1066 |
Yes | - |
| Three Promo Image Boxes | 704 x 520 | - | Yes |
| Three Roundel Promos | 400 x 400 | - | Yes |
| Two Promo Image Boxes | 704 x 520 | - | Yes |
| Widescreen Hero Image | 1600 x 500 | - | Yes |
| Widescreen Landing Page Additional Features | Left feature 1 or 2: 650 x 367 Right feature 1 - 4: 310 x 175 |
- | Yes |
| Widescreen Landing Page Stacked Features | 740 x 378 | - | Yes |
| Widescreen Promo Images 2 Columns | 960 x 532 | - | Yes |
| Widescreen Promo Images 3 Columns | 620 x 340 | - | Yes |
What tool should I use to resize my image for the web?
Pixlr is a free online image editing platform where you can edit your image to correct size for any content type you want to use. To use Pixlr go to Pixlr.com. This tool is easy to use and you can resize your image in a few short steps.
The Smart Resize image is ideal for images that have no central point you want to hone in on. It will resize to your demensions without distorting the image, cropping automatically.
The Crop option allow you to hone in on a particular part of your image and manually crop it to the dimensions you need.
Paint.net is free image editing software that you can download. It is an offline tool, so it works when you are unable to connect to Wi-Fi. Get Paint.net
How do I use Smart resize... in Pixlr?
In the example below we will resize a photo from Width 3917 x Height 3191 to the Standard Media Library Normal page (left-nav, no right sidebar): Max width - 735px, we are going for a width of 413.
-
- Open Pixlr - https://pixlr.com/e/
- Click on Open Image button and choose the image you wish to resize.

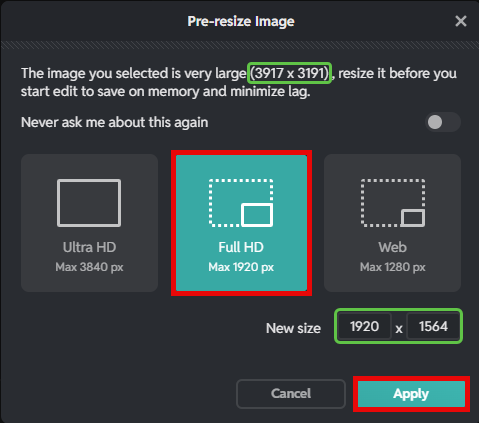
- A typical photo, taken on a smartphone is 4290 px wide but a widescreen monitor is only 1920 px wide. When you click on Open Image and the image is too big, Pixlr will detect this and ask to pre-resize it to 1920 px wide. Don't amend the dimensions here, ensure Full HD is chosen and click on Apply.
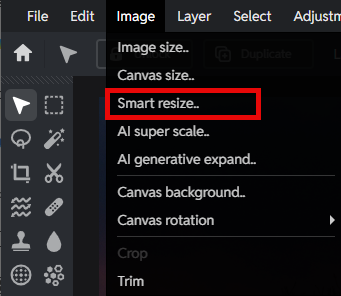
- On the top ribbon, click on the Image tab and choose Smart resize...
- A pop up will appear where you can adjust the width or height to the dimensions you need.
- Click on the Lock propotions toggle switch to switch it off, leave the Method on Fill and change the dimensions to what you want, Pixlr will retain the image integrity and centrally focus the image.
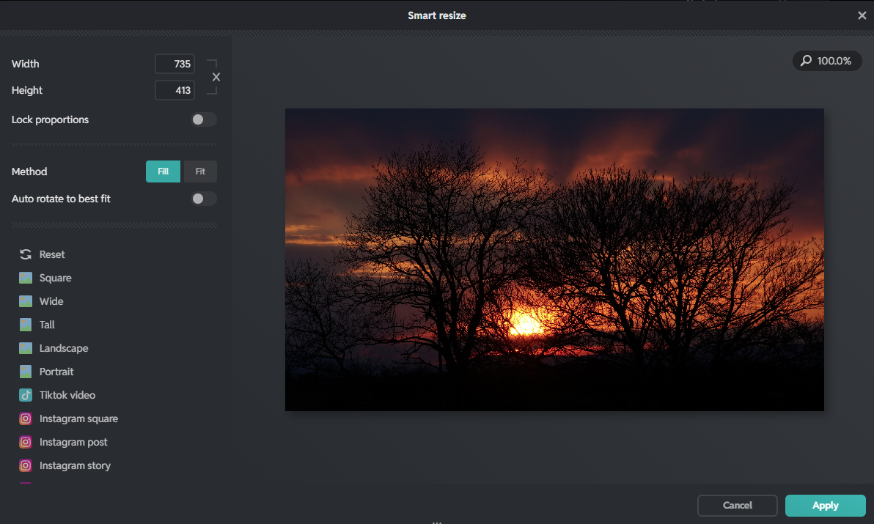
- Click Apply.
- Now, click on the File Tab and choose Save. A Save popup will appear.

- We recommend saving as a JPG as the kb size will be smaller than a PNG image.
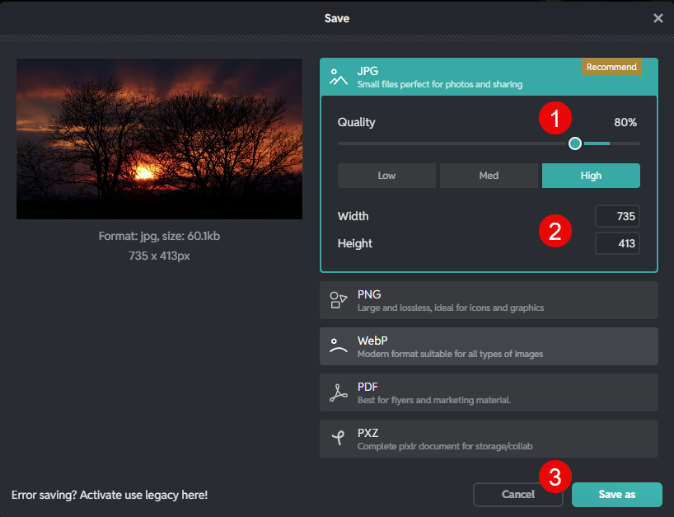
- Change Quality to 80%
- You can confirm that the new dimensions of your image are correct.
- Click on Save As
We recommend using a file name that specifies the new width and height of the image. E.g. nameofmyimage-735x413.jpg
When choosing your file name: Use – (dash) instead of spaces. Images with spaces in their names may not upload to the web server.
Tip: Don't use any characters that are reserved for web addresses in its filename ( ! * ' ( ) ; : @ & = + $ , / ? % # [ ] ). If you do, the image will upload but may not appear on your webpage.
How do I resize my image, using the Crop tool, in Pixlr?
In this example below we will use the crop tool to resize a photo from Width 1188 x Height 746 to the Standard Media Library Normal page (left-nav, no right sidebar): Max width - 735px, we are going for a width of 413. We are using the crop tool as we want a specific part of the photo to be centralised.
- Open Pixlr - https://pixlr.com/e/
- Click on Open Image and choose the image you wish to resize.

- For Information. A typical photo, taken on a smartphone is 4290 px wide but a widescreen monitor is only 1920 px wide. When you click on Open Image and the image is too big, Pixlr will detect this and ask to pre-resize it to 1920 px wide. Don't amend the dimensions here - just ensure Full HD is chosen and click on Apply.

- The image we are using does not exceed these demensions wo we bypass this popup and the image opens in Pixlr.
- Click on the Crop icon

- The top ribbon will change so you can see the crop options.
a. Note the current image dimensions
b. Ensure the FREE option is highlighted
- Insert the new dimensions you need (in this case, 735x413) and a resize box will appear
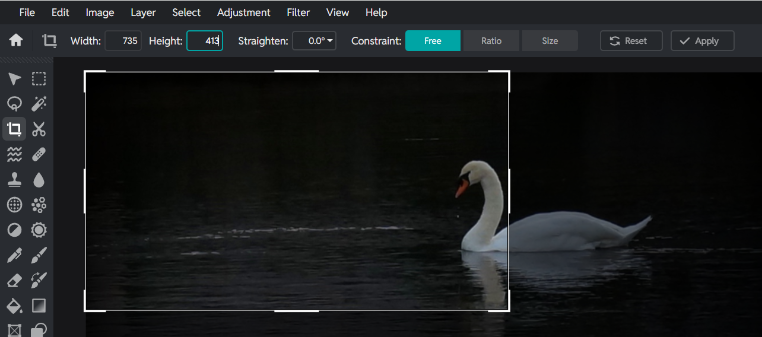
- Hover your mouse over its centre, your mouse pointer will change to crosshairs, click on it to move it over the part of the image you want to crop to.
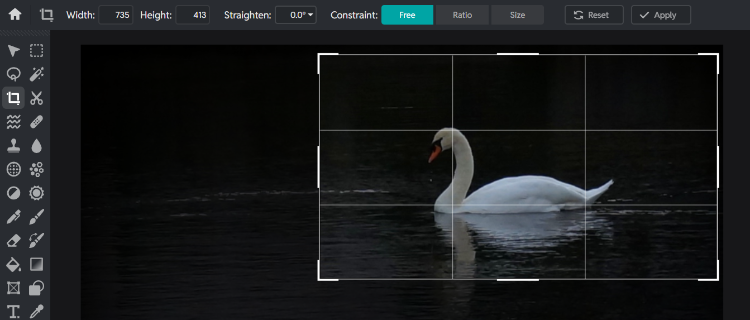
Warning: If you click and drag when you're too close to any edge of the resize box (i.e. when the mouse pointer is directional arrows - not crosshairs), you will change the dimensions you are resizing it to. - Once you are happy with the placement of the grid box click Apply.

- The selected area will become the new image
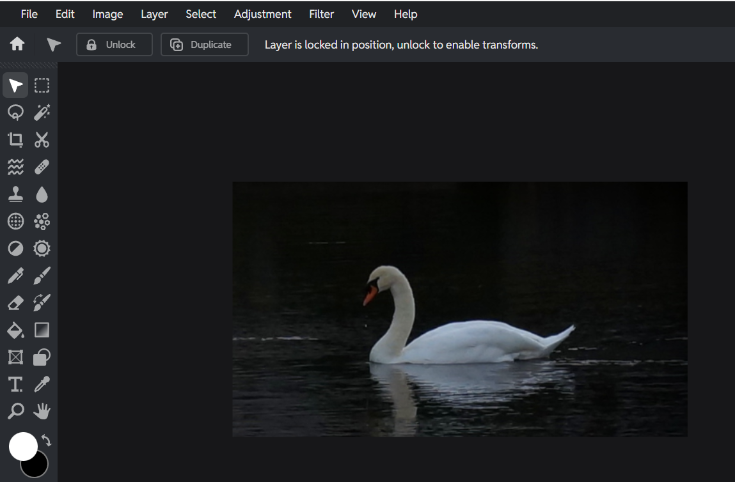
- Now click on the File Tab and choose Save.
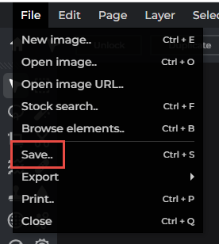
- A Save window will appear, we recommend saving as a JPG as the kb size will be smaller than a PNG image
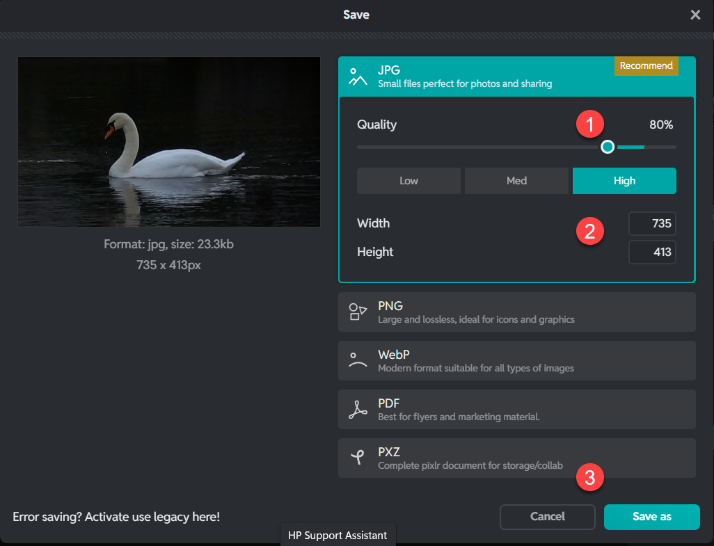
- Change Quality to 80%
- You can confirm that the new dimensions of your image are correct.
- Click on Save As
The 'Save as' popup appears. We recommend using a file name that specifies the new width and height of the image. E.g. myimage-500x90.jpg
When choosing your file name: Use – (dash) instead of spaces (images may not upload to the web server if they have spaces in their name).
Tip: Don't use any characters that are reserved for web addresses in its filename ( ! * ' ( ) ; : @ & = + $ , / ? % # [ ] ). If you do, the image will upload but may not load on your page.
How do I Resize an image in Paint.net?
- First choose the image on your computer which you want to use. Open Paint.net and click on the File Open icon on the top ribbon as shown below and select your image file.

- Click on the Image tab and choose Resize…

- A Resize popup will appear
- Click the radial for By absolute size
- Make sure Maintain aspect ratio is ticked so the width/height will automatically adjust depending on the measuement option you are adjusting, this will avoid any distortion of your image
- Change the width or height to the closest size to the size you need for your content type – correct size is available at https://www.universityofgalway.ie/t4training/faqs/images/#bgImgLocations. Adjust by the longest edge to ensure the size of your image width or height does not resize to below the dimensions you require, you can crop or trim your image after resizing following the instructions below.
- Click OK

- Click the File tab and choose Save As if you wish to retain a copy of the original image too. The 'Save as' popup appears. We recommend using a file name that specifies the new width and height of the image. E.g. myimage-500x90.jpg
When choosing your file name: Use – (dash) instead of spaces (images may not upload to the web server if they have spaces in their name).
Tip: Don't use any characters that are reserved for web addresses in its filename ( ! * ' ( ) ; : @ & = + $ , / ? % # [ ] ). If you do, the image will upload but may not load on your page.
- When you click Save you will see a Save Configuration Popup box – Click OK .

The resized image will be shown on screen, if you still need to crop or trim your image to meet a content type size, see further instructions on how to do that.
How do I crop an image in Paint.net?
- First choose the image you use which you want to use. Open Paint.net and click on the File Open icon on the top ribbon as shown below and select your image file.

- If your image is 800 x 600px but you want to capture a particular part of your image as a thumbnail image of 200 x 200 you will need to crop your image to reach those dimensions.
- Click on the Rectangle Tool in the Tools Pane

- The Tool ribbon will appear at the top of the page

- You have the option of Any Size (You can freehand draw the selection box), Fixed Ratio (You can freehand draw the selection box which will hold the ratio of the dimensions you specify) or Fixed Size (Specify the dimensions you want and click on the image where you want the top left hand corner of your selection box to be).
- If you need to move the selection box click on the Move Selection tool (there are 2 Move Selection icons please ensure to choose the bottom one as illustrated on image below).

- You can now drag your selection box over the preferred section


- Click Image tab and Crop to selection. (image below).

- The area of the image you selected will be cropped from the original image

- Save your new image, click on the File Tab and choose Save As.

We recommend using a file name that specifies the new width and height of the image. E.g. myimage-500x90.jpg
When choosing your file name: Use – (dash) instead of spaces. Images with spaces in their names may not upload to the web server.
Tip: Don't use any characters that are reserved for web addresses in its filename ( ! * ' ( ) ; : @ & = + $ , / ? % # [ ] ). If you do, the image will upload but may not appear on your webpage.
How do I trim an image to the right size in Paint.net?
- You can also trim your image to get an image with specific dimensions. For example, if your image is 2000x1400px and you need it to be 250x150px.
- Click on the Image tab and choose 'Canvas Size' from the dropdown options.

- The Canvas Size popupSize popup with appear

- Choose By absolute size
- Leave Maintain aspect ratio unticked
- Change the width to the required size and change the height to the required size - correct size is available at https://www.universityofgalway.ie/t4training/faqs/images/#bgImgLocations
- You will Anchor your image depending on what element of the photo is important i.e. if you anchor to the center - the image will be trimmed equally as required on all sides, if you anchor to the top left corner the image will be trimmed on the right side and the bottom as required.
Click OK and the image should now be trimmed to your required dimensions.


