-
Courses

Courses
Choosing a course is one of the most important decisions you'll ever make! View our courses and see what our students and lecturers have to say about the courses you are interested in at the links below.
-
University Life

University Life
Each year more than 4,000 choose University of Galway as their University of choice. Find out what life at University of Galway is all about here.
-
About University of Galway

About University of Galway
Since 1845, University of Galway has been sharing the highest quality teaching and research with Ireland and the world. Find out what makes our University so special – from our distinguished history to the latest news and campus developments.
-
Colleges & Schools

Colleges & Schools
University of Galway has earned international recognition as a research-led university with a commitment to top quality teaching across a range of key areas of expertise.
-
Research & Innovation

Research & Innovation
University of Galway’s vibrant research community take on some of the most pressing challenges of our times.
-
Business & Industry

Guiding Breakthrough Research at University of Galway
We explore and facilitate commercial opportunities for the research community at University of Galway, as well as facilitating industry partnership.
-
Alumni & Friends

Alumni & Friends
There are 128,000 University of Galway alumni worldwide. Stay connected to your alumni community! Join our social networks and update your details online.
-
Community Engagement
Community Engagement
At University of Galway, we believe that the best learning takes place when you apply what you learn in a real world context. That's why many of our courses include work placements or community projects.


Creating Accessible Exam Papers
The Exams Office circulate templates and common error documents for the exam paper submission process at the beginning of Semester 1 and Semester 2, and prior to Autumn Sittings. The template is formatted in Arial, 12-point.
Below are some tips on how to ensure your exam paper is accessible for students who may rely on screen readers or similar assistive technology. Some broader points on formatting are also included.
Basic formatting tips
- Text should be a minimum of single-spaced.
- White space should separate paragraphs or sections.
- Use bold to make important points or instructions stand out.
- Avoid using features such as underlining and BLOCK CAPITALS.
- Use italics sparingly and avoid blocks of italicised text.
- Use left aligned text only, do not justify text.
- Avoid splitting a word between two lines.
Making tables accessible
There are a few easy steps you can take to make tables more accessible. Students without any difficulty with their sight can visually scan a table, and quickly make visual associations between data in the table and their appropriate row and/or column headers. For students who rely on assistive technology, it can be more difficult to intrepret the data if certain formatting steps are not followed correctly.
- Give your data table a Title (right-click on the table and select Table Properties > Alt Text > Title)
- In Table Properties > Row, ensure 'Repeat as header row at the top of each page' is ticked and 'Allow row to break across pages' is unticked.
- Designate your table headers correctly. You should abe able to access these tickboxes under then 'Table Design' tab (note that this table on appears in Microsoft Word when the table is selected)
- Data tables must have only one header row and/or one header column
- Make your tables as simple as possible. They should have no nested, merged or split cells.
- Do not use the Draw Table tool to create the table - use Insert > Table instead.
- Never display data using spaces instead of a table object.
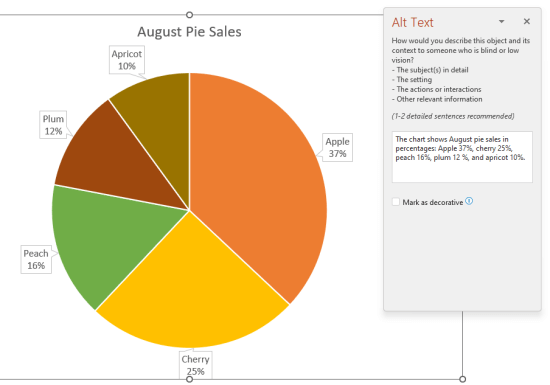
Providing alternative text for images
If your exam paper contains an image or graph, you must provide alternative text to provide the same information for someone who cannot see it. To add alt text, follow the relevant instructions from Microsoft for your version of Windows/Mac and Office.
The alt text itself should describe the image with sufficient detail for a student with a visual disability to receive the same key information. For instance, describing a chart as 'A bar chart showing sales over time,' for example, would not be adequate for a student to answer a question that relies on interpreting the sales data. Instead, summarise the insight, e.g. 'A bar chart showing sales over time. In July, sales for brand A surpassed sales for brand B and kept increasing throughout the year.' and include data such as percentages, dates in the alt text or in an accompanying table. Alt text should also clearly describe the beginning point, progress, and conclusion of flow charts.
Microsoft have a short guide that you may find useful in writing alt text.
Creating accessible PDFs
There are a few easy steps that you can take when exporting a Word doc to PDF that will make the end result more accessible. Ensure that the end result contains text that you can highlight on screen: an image PDF (a snapshot or scanned image of your document) is not at all accessible.
In Microsoft Word (Windows):
- Do not print to PDF. This method will not preserve the document structure and will result in a PDF document with no tag structure.
- Select 'Save As' in the file tab.
- Select the location you want your file to be saved at, i.e.: Desktop, Documents folder
- Select 'PDF' from the 'Save as Type' Drop down menu.
- Click the Options button below the drop down menu.
- Check the box next to the 'ISO 19005-1 Compliant (PDF/A)' and press OK.
- Save your file.
In Microsoft Word (Mac):
Do not print to PDF
- Click 'File' tab and select 'Save A Copy'.
- Select the location you want to save your file (i.e. Desktop, Documents folder, or other location)
- Select 'PDF' from the 'Save as' Type drop-down menu.
- Select the button next to 'Best for electronic distribution and accessibility'
- Click 'Export'.


